



Key takeaways
- Most quoting errors in flexible packaging come from a few rules applied by hand: which film width is costed, how kilograms become square metres, how long set-up takes, how many lamination passes a structure needs, and how much wastage to allow.
- For Sahl Pack, we wrote these rules into a costing calculator so every quote applies them the same way.
- Sales sees an allowed price range, not machine rates or margins. Rates are updated monthly by an administrator only.
- Odoo 19 holds the machine side as standard: work centres with set-up time, clean-up time and cost per hour, and operations on the bill of materials.
- After production, Odoo compares the expected cost of a manufacturing order with its real cost. That comparison shows whether the quoting rules hold up.
Overview
A flexible packaging quote has many moving parts. Film is bought by the kilogram in fixed widths but used by the metre. Presses need set-up time before they run. A three-layer pouch needs two lamination passes. Every process creates some waste. The quote is generated from the requirement form described in enquiry to job code.
When these are worked out in a spreadsheet, two estimators can price the same job differently, and a missed step goes unnoticed until the job is run.
This article explains the costing rules we documented for Sahl Pack (Modern Sahl Industries), a Saudi flexible packaging manufacturer, and how they connect to Odoo 19. The calculator was still being finalised with the client when the requirements were signed off, so this describes the agreed design, not results.

The five costing rules
1. Cost the film width you will actually use
If the exact film width is not in stock, the calculator costs the job on the next wider width that is available. A job that needs 638 mm is costed on 660 mm stock. Each width is its own stock item; see film lots and item codes.
The 22 mm difference is trimmed off and paid for. On a 660 mm roll, that is 22 ÷ 660 = 3.3% of the film width. Small differences like this add up across a large order.
The rule needs the calculator to know which widths are in stock. That only works if each width is a separate item in inventory, not one item called “PET film”.
2. Convert kilograms to square metres
Film is bought by weight, but a pouch uses area. The calculator converts kilograms to square metres using the film’s density and micron thickness.
The weight of one square metre in grams is density (g/cm³) × thickness (microns). So:
- m² per kg = 1,000 ÷ (density × microns)
- Example: a 12-micron film with a density of 1.4 g/cm³ weighs 16.8 g/m², so 1 kg covers about 59.5 m².
Use the density from your supplier’s data sheet. The example only shows the method.
3. Include set-up time, not just running time
Printing cost uses a 40-minute set-up and a conservative press speed of 200 metres per minute.
Example: a job with 10,000 metres of print runs for 10,000 ÷ 200 = 50 minutes. With set-up, the press is busy for 90 minutes. Costing only the 50 minutes would understate press time by almost half.
The shorter the job, the larger the share of set-up. A 2,000-metre job runs for 10 minutes but still needs 40 minutes of set-up, so set-up is 80% of its press time.
4. Count lamination passes, not layers
Lamination is costed per pass. One pass joins two layers. Two passes join three. A PET / aluminium foil / PE structure needs two passes, each with its own adhesive, machine time and set-up.
A common error is to cost lamination once per job. For a three-layer structure, that leaves out half of the lamination cost.
5. Allow for wastage
The calculator applies a default 5% job wastage, with standard set-up times included. How the planner sets it is covered in per-job wastage set by the planner.
At production stage, the planner sets the wastage allowance for each job. A job with more processes and substrates usually needs more. The 5% is a quoting assumption. The per-job figure is what production works to. We recorded this distinction in the requirements so the two numbers are not confused.
Worked example: a three-layer stand-up pouch
Here is how the five rules apply to one job. The structure is PET 12 µm / aluminium 7 µm / PE 100 µm on a 638 mm web, with 10,000 metres of print. The densities are typical published values used only to show the method. Use your supplier’s figures.
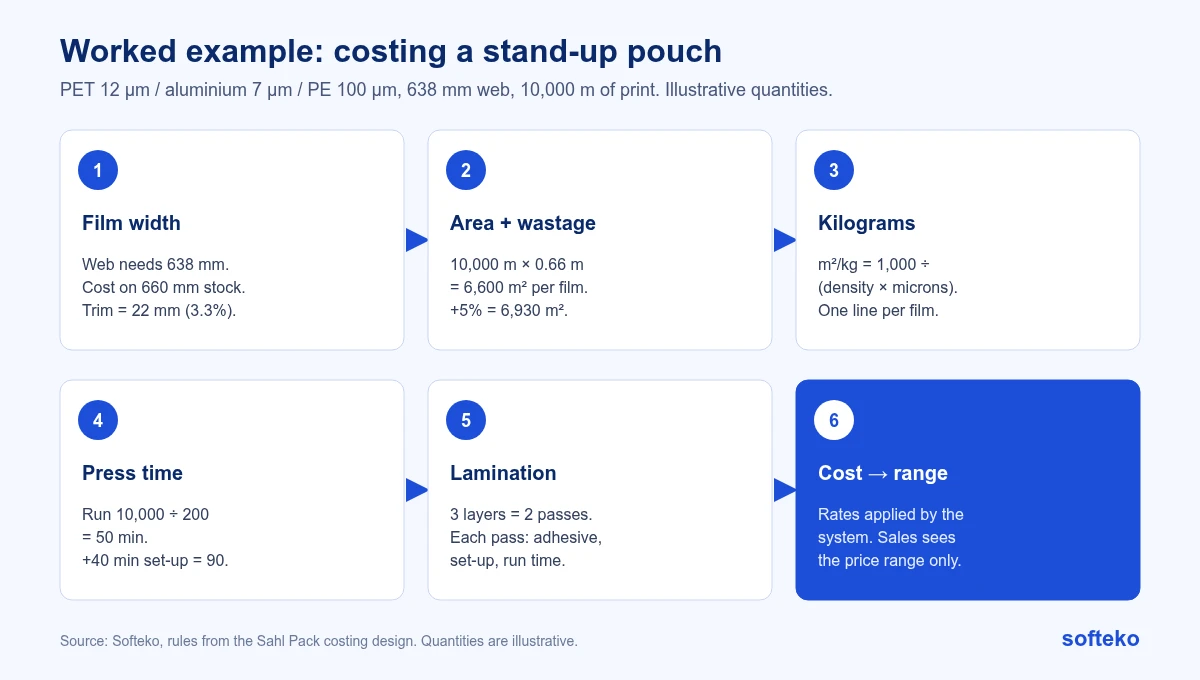
Step 1: width. 638 mm is not in stock, so the job is costed on 660 mm.
Step 2: area. 10,000 m × 0.66 m = 6,600 m² of each film. With 5% wastage, 6,930 m².
Step 3: kilograms. Each film is converted separately:
| Film | Density (g/cm³) | Microns | g/m² | m² per kg | kg for 6,930 m² |
|---|---|---|---|---|---|
| PET | 1.4 | 12 | 16.8 | 59.5 | 116.4 |
| Aluminium foil | 2.7 | 7 | 18.9 | 52.9 | 131.0 |
| PE | 0.92 | 100 | 92.0 | 10.9 | 637.6 |
| Total | 885.0 |
The PE layer is more than 70% of the film weight. A small error in its density or thickness moves the cost more than the other two films together.
The 22 mm trim is 3.3% of each film, about 29 kg of this order. It is paid for and ends up as waste.
Step 4: press time. 10,000 ÷ 200 = 50 minutes of running, plus 40 minutes of set-up, so 90 minutes at the press rate.
Step 5: lamination. Three layers need two passes. Each pass is costed with its own adhesive, set-up and machine time.
Step 6: cost and price. The system applies the confidential hourly rates and material costs, then shows sales the allowed price range. Sales does not see the rates or the cost behind the range.
If the same job were costed by hand on 638 mm, with press running time only and one lamination pass, every one of those three shortcuts would make the quote too low. None of them would show up until the job was produced.
Who sees what
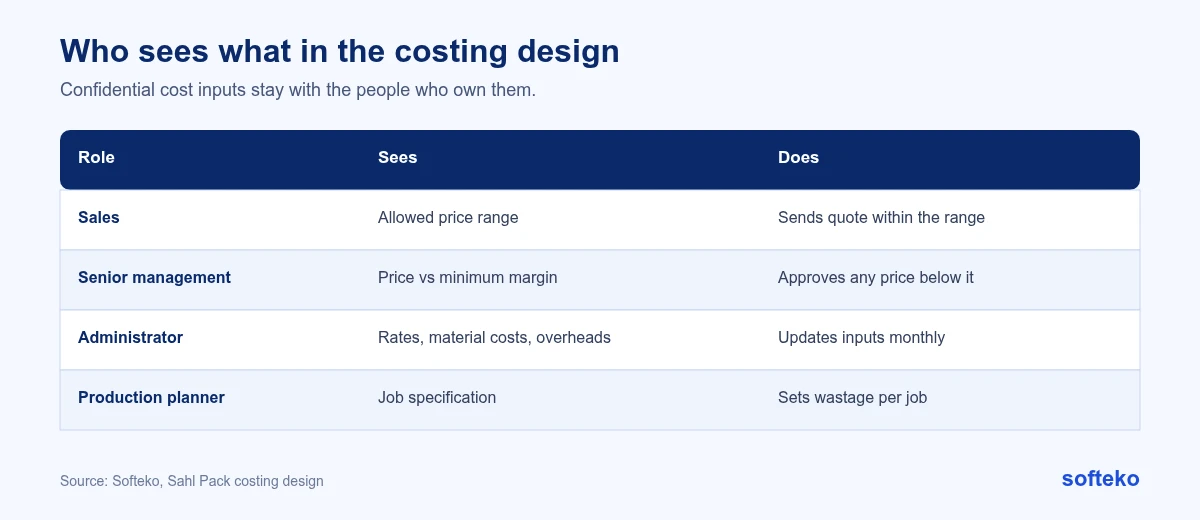
Costing uses confidential inputs: machine hourly rates, material costs and overheads. The design keeps them away from sales:
- Sales sees only the allowed price range. Closing nearer the top of the range earns a higher commission.
- Senior management must approve any price below the minimum margin before the quote is sent.
- Administrators are the only role that can update cost inputs, such as hourly rates and electricity rates. They do this monthly.
Costs are grouped by process cost centre (printing, laminating, slitting, pouching), each with machine depreciation, direct labour and utilities.
Quotes for repeat orders
A repeat order can reuse the previous requirement form, but the costing always runs again. Film and ink prices change, and last year’s price may now be below cost.
How to set up the machine side in Odoo 19
The quote-stage calculator is custom work. The machine data it relies on, and the cost check after production, are standard Odoo 19. This is how to set them up.
Step 1: Turn on work orders
Go to Manufacturing › Configuration › Settings and, in the Operations section, enable Work Orders [2]. Without it, bills of materials have no operations and work centres are not used.
Step 2: Create one work centre per machine or line
Go to Manufacturing › Configuration › Work Centers and create a work centre for each press, laminator, slitter and pouch machine. On the General Information tab, enter:
- Setup Time: the time needed before work can start on a work order.
- Cleanup Time: the time needed after the work order finishes.
- Cost per hour: the operating cost of the work centre, plus a per-employee value if labour is costed separately [1].
- Time Efficiency: a percentage that adjusts how fast this machine runs compared with the standard [1].
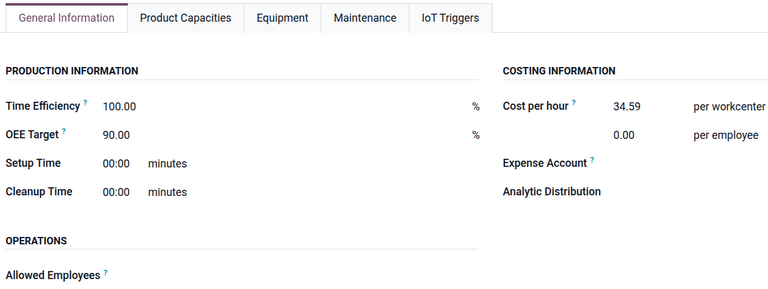
If set-up varies by product, the Product Capacities tab holds a setup time and cleanup time for each product at that work centre [1].
Keep the hourly rates in step with the calculator. If the administrator updates the press rate monthly in one place and not the other, the quote and the post-production check will disagree.
Step 3: Add operations to the bill of materials
On the bill of materials, open the Operations tab and add one line per process: printing, lamination pass 1, lamination pass 2, slitting, pouching. Each operation is linked to a work centre and has a default duration [2].
For the pouch in the worked example, that means two lamination operations, not one. The structure of the bill of materials should follow the same rule as the quote.
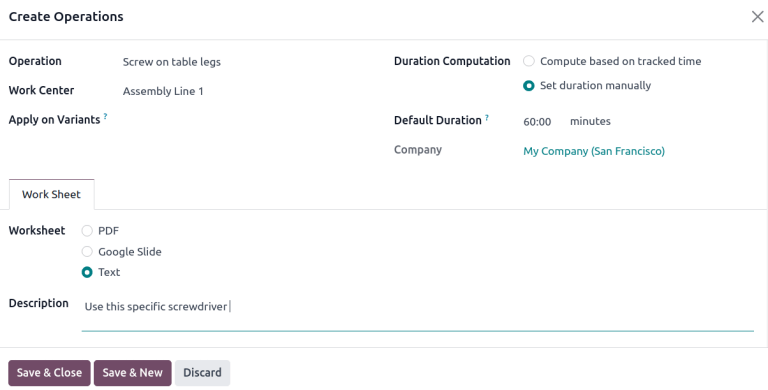
Odoo durations are set per bill of materials quantity, while the press speed is in metres per minute. The calculator does that conversion at quote stage. In Odoo, each operation’s Duration Computation is either Set duration manually, which uses the Default Duration, or Compute based on tracked time, which estimates it from the last few work orders [2].
Step 4: Compare expected and real cost after production
Open a manufacturing order and click the Overview smart button. It shows the expected cost (MO Cost) and the Real Cost for each component and each operation [3].
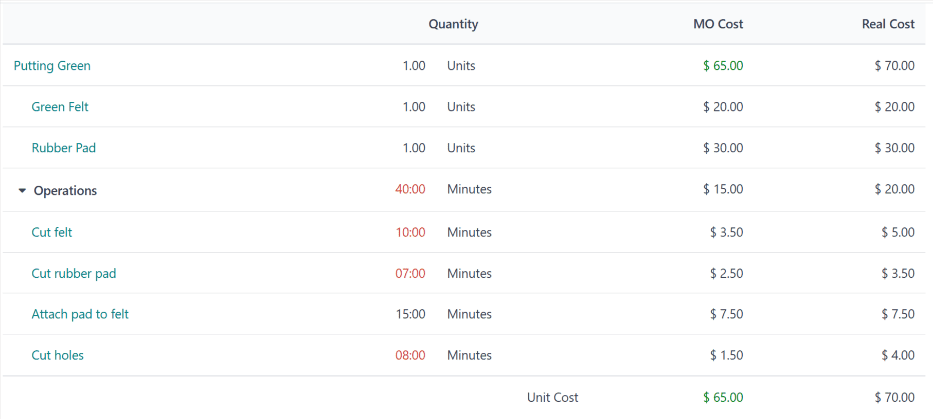
For long jobs that span a month end, Odoo can post the value of work in progress so partly finished jobs appear on the balance sheet [4].
How this maps to Odoo 19
| Costing need | In Odoo 19 | Approach |
|---|---|---|
| Machine set-up time and hourly cost | Work centres hold setup time, cleanup time and cost per hour [1] | Standard |
| Process steps and their times | Operations on the bill of materials, each at a work centre with a default duration [2] | Standard |
| Expected vs actual job cost | The manufacturing order overview shows the MO cost and the real cost side by side [3] | Standard |
| Partly finished jobs on the balance sheet | Work-in-progress entries can be posted for long jobs [4] | Standard |
| Inventory valuation | Average cost (AVCO), in Saudi riyal as base currency | Standard |
| Quote-stage calculator: width, kg to m², passes, wastage, price range | Custom calculator feeding the quotation | Development |
| Hiding costs from sales | Access rights on cost data | Configuration |
Standard Odoo calculates cost once a manufacturing order exists. The quote comes earlier, before there is an order or a final bill of materials. That gap is why the calculator is development work. Traders face the same gap with landed cost for a trader. For everything else, see what Odoo covers as standard.
How to tell if your costing improved
The old version of this article promised returns within months. We would rather show you how to measure it yourself:
- Compare the quoted cost with the real cost of each manufacturing order, by product type.
- Track wastage per job against the planner’s allowance.
- Count how many quotes were re-priced after the technical review.
- Watch how many quotes need management approval for low margin.
If quoted and real costs stay close, the rules work. If they drift, the overview shows which component is off: materials, operation time or labour [3].
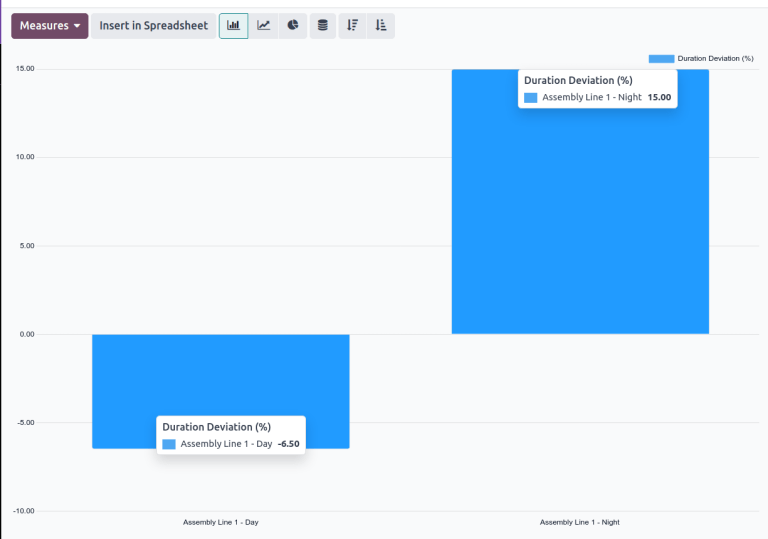
To check machine time, go to Manufacturing › Reporting › Work Orders, remove the default filter, and choose Measures › Duration Deviation (%). Grouped by work centre, it shows whether jobs take longer or shorter than expected [1]. If one press is always slower than planned, the 200 m/min assumption may be too high for that machine.
Checklist before you build a costing calculator
- List every cost input and who owns it.
- Decide how often machine rates are updated, and by whom.
- Write down your width rule, set-up times and press speeds.
- Agree how lamination passes are counted for each structure.
- Agree a default wastage for quoting, and who sets it for production.
- Decide who may see costs, and who may approve a low-margin price.
- Set up work centres and operations in Odoo with the same times and rates the calculator uses.
FAQ
Why cost on a wider film than the job needs?
Because that is the roll you will run. The trimmed edge is paid for and becomes waste.
Why use a conservative press speed?
A quote should hold on a normal day, not only on the best day. If your presses run faster, the job earns more margin.
Can Odoo calculate a packaging quote as standard?
Odoo calculates manufacturing order costs from components, operation times and work centre rates [3]. A quote-stage calculator for film width, kg to m² and lamination passes needs development.
Where do set-up times live in Odoo?
On the work centre, as Setup Time and Cleanup Time. If they differ by product, use the Product Capacities tab of the work centre [1].
Should the quoting wastage match production wastage?
No. Quoting uses one default. Production sets an allowance for each job, then records actual waste, which shows whether the default needs adjusting.
Put your costing rules on one page
Write your rules down as plainly as this article does. If two estimators would still price the same job differently, the rules are not finished. We can help you turn them into a calculator in Odoo. The calculator itself is Odoo customisation work.
References
[1] Odoo, Work centers, Odoo 19.0 documentation. https://www.odoo.com/documentation/19.0/applications/inventory_and_mrp/manufacturing/advanced_configuration/using_work_centers.html
[2] Odoo, Bill of materials, Odoo 19.0 documentation. https://www.odoo.com/documentation/19.0/applications/inventory_and_mrp/manufacturing/basic_setup/bill_configuration.html
[3] Odoo, Manufacturing order costs, Odoo 19.0 documentation. https://www.odoo.com/documentation/19.0/applications/inventory_and_mrp/manufacturing/basic_setup/mo_costs.html
[4] Odoo, Work-in-progress costs, Odoo 19.0 documentation. https://www.odoo.com/documentation/19.0/applications/inventory_and_mrp/manufacturing/basic_setup/work_in_progress.html
[5] Screenshots: Odoo S.A., Odoo 19.0 documentation (Work centers, Bill of materials, Manufacturing order costs), licensed under CC BY-SA 4.0 (https://creativecommons.org/licenses/by-sa/4.0/). https://www.odoo.com/documentation/19.0/